Library Page
If you are manually uploading the content to your server, you will need to manually create the library file first. The library file is needed as it acts as a list of all of your magazines that can be displayed in the app and in the online archive/library.
Follow these steps to manually create and upload your library files:
- Click Library from the top menu and select Create New Library. Choose to store this in a new folder somewhere on your computer.
This is the library editor: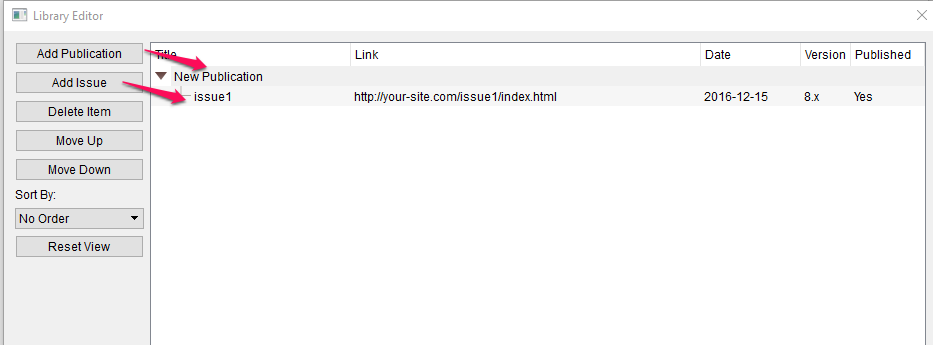
- Click Add Publication to create a publication group that your issues will fall into. You could give this a title such as Acme for example, or whatever the title of your publication is.
- Then click Add Issue to add individual issues to the publication library. Give it a title and the URL link for viewing it online. Once done making changes, click Save Changes and your library files will be created in the folder you chose to store them.
- You can then come back and edit this local library file whenever you create new issues for example, so that they’re part of the same archive/library. Upload to an area on your web server.
- Let’s say for example https://yoursite.com so your library.json file is available at https://yoursite.com/library.json . All you would need to do is drag the library.json file from where you stored it to the server. This URL will get added to your bookinfo’s 313 and 313b values – don’t remove these if you wish to utilise the apps.
- Then when you create the magazine you would be asked to enter the library path URL so the location you enter would be dependent on where you upload the library file on you server.
Landing Page
Creating your library landing page files. These only need to be created and uploaded once and don’t need to be updated as you create new issues.
- Create a new folder on your desktop and call it something like landing page files.
- Open the Flipbooks application. From the top menu, select Library and then select Edit Local Library Landing Page option and choose the folder you created in step 1
- Once the interface is open, you can customize the look of the landing page if you wish. Once you’re done, click Save and then Close the editor.
- You should now find the following files in your folder you created in step 1:

- Take all 4 files/folders and upload directly to your server (same place on the server where you uploaded your library file from step 1).