As mentioned in other articles on App Submission, it is possible to generate the App Store Certificate, Provisioning Profile and APNS key and send them to 3D Issue to use during your App Submission.
The instructions below provide the steps (as of Feb 2019) for this. The process can change quite often so if you have trouble, we’ll do our best to help.
1. Create your APP ID
- Go to The Apple Developer console App IDs page. Login with your Apple ID if not already logged in.
- Click the + icon in the top right corner.
- On the page that opens enter the data as described below:
App ID Description – Name:
Use your app’s name.
App ID Prefix
Keep the default.
App ID Suffix
Select Explicit App ID and in Bundle ID, enter the same value as is entered in the Binary details on the 3D Issue apps Dashboard.
App Services
Check the box beside the following services: Associated Domains, Push Notifications.
- Click Continue
- Click Register on the next page. Then Done.
2. Create your Signing Certificate
- Go to the Apple Developer console Certificates page. Login with your Apple ID if not already.
- Click the + icon in the top right corner.
- On the next page, scroll down to the Production section and check the box beside App Store and Ad Hoc.
- Continue scrolling down, and click Continue. On the next page click Continue
- For these next Steps you’ll need to be using a Mac.
- In the Applications folder on your Mac, open the Utilities folder and launch Keychain Access.
- Within the Keychain Access drop down menu, select Keychain Access > Certificate Assistant > Request a Certificate from a Certificate Authority.
- In the Certificate Information window, enter the following information:
Your Email Address: Enter your email
Common Name: Use your company or app name. Do not enter any quotes, commas or other punctuation marks.
CA Email Address: Can be left blank
Request is: Check Saved to disk
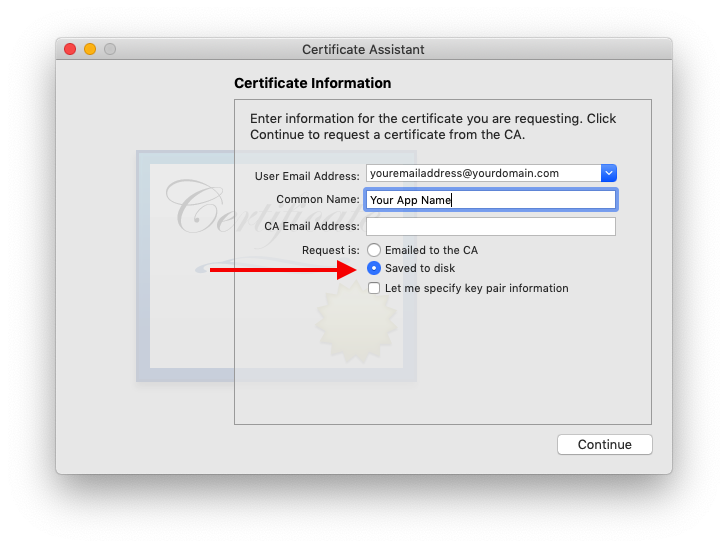
- Click Continue within Keychain Access and save the CSR file to your Desktop.
- Go back to your browser and upload the CSR to Apple. Click Continue and then download the certificate.
- When downloaded, click the Certificate file to open it and import it to your login keychain.
- Open Keychain Access again and in the left column click on login then, near the bottom left, click on Certificates.
- Using the Search box, search for your company or app name
- You should see a certificate in the centre of the page, with a name similar to:
iPhone Distribution: Your company name (yourappleteamid)
Select this cert. - Then click the small arrow to the left of the cert, to expand it and show its key.
- Select the both the cert and it’s key and right-click (ctrl-click).
- Select Export 2 items.
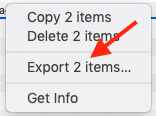
- In the dialog that opens, change the File Format to Personal Information Exchange (.p12) then save the file to your Desktop. When setting the password, please note that you need to send us that also, so don’t use a password you use somewhere else!
3. Create your Provisioning Profile
- Go to the Profiles page on the Apple Developer console. Login if you aren’t already.
- Click the + icon in the top right corner.
- Scroll down the page and under Distribution select App Store
- Click Continue
- On the next page, select your app’s App ID, then click Continue
- Select the Certificate you just created. Hint: Its date will be the newest.
- Click Continue
- Then download the Provisioning Profile file.
4. Create the APNS key
- Go to the Keys page on the Apple Developer Console. Login if you are not already.
- Click the + icon in the top right corner.
- On the next page, give the key a name, such as “3D issue” or your App’s name.
- Check the box beside Apple Push Notifications Service (APNs)
- Click Continue
- On the next page click Confirm.
- On the following page, Download the key and make a note of the key ID.
5. Package and send.
Put all the files you just created into a Folder and compress it to a zip file.
The zip file should include:
- Your Certificate P12
- Your Provisioning profile (.mobileprovision)
- Your APNS key (if created)
In your email you should also include:
- The password for your Certificate file
- The Key ID for your APNS key.